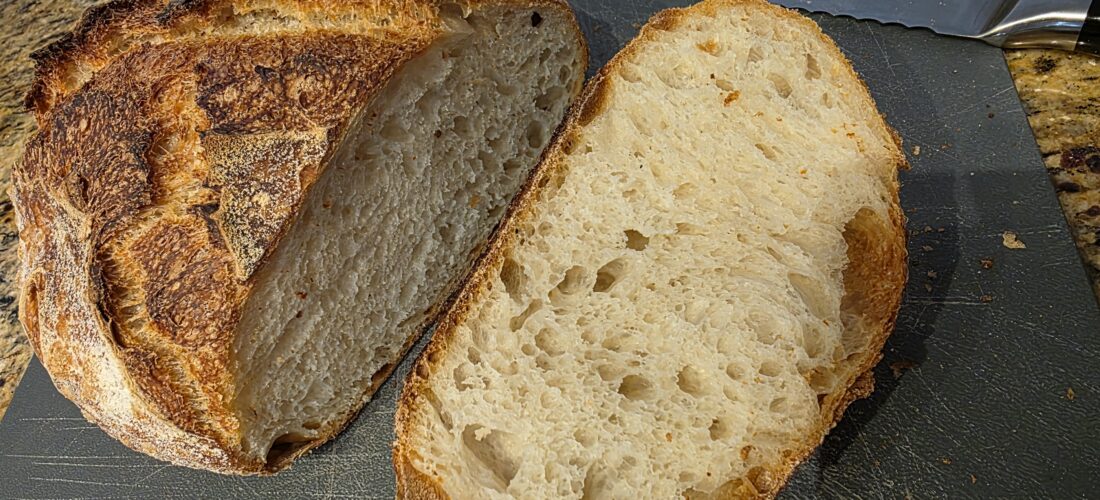
I was late to the game, but I’ve kept it going. Every week, I make a loaf. I don’t care how it looks, other than “oven spring,” which tends to correlate to flavor.
The best source for starter is a friend, but I started with this.
This is the video that is the basis of my routine:
https://www.blessthismessplease.com/easy-sourdough-bread-recipe/
https://www.youtube.com/watch?v=DLslUS20iUA
Tools I Use:
- Kitchen scale: a must
-
This bowl
- https://www.amazon.com/dp/B003TF22DQ
- Or any 2.5-quart or larger bowl.
-
Mason jars with smooth sides up the inside. This makes scraping off starter easier if the sides are straight and smooth.
- https://www.amazon.com/Ball-Mouth-16-Ounces-Mason-Bands/dp/B07DPRLQJG
- For now, literally any jar or container will do.
- A silicone jar spatula is handy.
- A clean set of scissors or a bread-scoring tool—a razor blade and handle that is a bit of a hassle.
- A Dutch oven that can handle high heat
- Proofing basket(s) with liners
- Bowl and counter scrapers
- King Arthur Bread Flour
- Salt
- Room-temperature bottled water
- Parchment paper
-
Plastic bags
- https://www.amazon.com/dp/B07B3QRNVN
-
Like the kind they used to have in the produce section, but not the compostable type they have now.
- As a side note, a roll of these is sooooo handy for so many things.
- For this, they will hold the proofing basket while the dough proofs, and they also hold the bread perfectly once it is made.
- A cooling rack
- Optional: nitrile gloves and napkins for efficiency
The Starter
- I am sending over about 25 grams of starter.
-
Put it in pretty much any container, but I use mason jars.
- Don’t use the little container I sent it over in long-term, but it will do for now.
-
Feed it by putting in equal amounts of starter, flour, and water.
- For example: 25g starter, 25g flour, and 25g water.
-
I typically do 50g of each.
- You throw away a lot of starter every week.
- I usually keep two starter jars going at all times. That way, if I drop or ruin one, I don’t have to start from scratch.
-
The first time you get it from me, feed it two days in a row. After that, you can feed it once a week.
- Discard down to 50g. I usually use a new jar to scoop into or use an empty jar for the base weight—but here I am telling a pharmacist how to do that sort of thing.
- Add 50g water and 50g flour, then stir.
- Cover the jar with a small piece of parchment paper and the jar lid turned upside down. That keeps it relatively moist but not airtight, so it can let air out as it expands while keeping moisture in.
- Wait until it doubles or more in size. Mine is usually about 2.5 times its original size when I use it. Then use it in the recipe or put it in the refrigerator.
-
Then you’ll be in a routine:
- Use it in a recipe.
- Put it in the refrigerator.
- A week later, take it out.
- Reduce it to 50g.
- Add 50g water and 50g flour.
- Stir and let it sit.
- Use it in a recipe again.
The Process
This is not perfection; this is what I do that seems to work and is minimally time-consuming. I use cheap dinner napkins to wipe off spoons and knives after mixing, before washing, because the starter is so sticky and clumpy.
I also use nitrile gloves when I handle the dough because, for me, it’s all about efficiency and timing. The less time I spend cleaning or washing my hands, the better. It adds about 40¢ to the cost of the bread, which is well worth it compared with washing sticky dough off my hands seven times.
- In the summer, start at about 8:00 a.m. by feeding the starter. It should be ready by 1:00 p.m.
- At 1:00 or 2:00 p.m., begin mixing the dough.
-
Mix 55g of starter, give or take 5g, with 10–15g salt and 350g water in a 2.5-quart bowl.
- Stir. The starter won’t mix in completely, but the salt will.
-
Add 500g bread flour.
- Stir with the spoon you used to scoop the starter, or use a spatula, until mostly mixed.
-
Mix the rest of the way by hand—squeezing, stirring, and scraping the dry flour off the side of the bowl with a nitrile-gloved hand.
- Do this for two to three minutes.
- Cover with the bowl’s cover, plastic wrap, or a wet towel.
-
Thirty minutes later, mix again, but not as thoroughly. Pull up the four sides of the dough twice—eight pulls total—as far as you can without pulling it apart, then fold it in on itself.
- Cover.
-
Thirty minutes later, for the third mix, pull each side once, but not as aggressively. You’ll see it starting to get pretty smooth.
- Cover.
-
Thirty minutes later, for the fourth mix, pull each side once—just enough to fold it over.
- Cover.
- Thirty minutes later, for the fifth mix—two hours after the initial mix—do one more round of the four corners.
-
Cover and let it sit for its bulk rise.
- This is where trial and error and feel come in.
- In summer weather, I usually let it go for five to six hours after the last mix. I think a little bubbling is good, but if it gets too bubbly or too poofy, it’s a bit too spent and won’t rise as well in the oven. YouTube videos are good for learning this part.
-
After about six hours, put the liner in the proofing basket, then flour the liner and rub the flour in.
- This helps the dough come out of the basket for baking.
- Dump the extra flour onto the surface you will use for the next step.
- Scoop the dough out of the bowl—a bowl scraper is helpful—onto a floured surface. I just use the granite kitchen counter.
- Pull the dough out pretty far to the left and right, maybe 18–24 inches, then fold it back in on itself.
- Turn it sideways and do it again. It won’t stretch as far this time—about 12 inches or so.
- Now you have a square. Fold the corners in.
- Flip it over and pull it toward yourself while rotating it to make a fairly tight ball. The videos explain this better than I do.
- Let it sit for 20–30 minutes.
- Tighten the ball again. Don’t repeat the folding part because that breaks down the gluten structure. You’re just tightening the ball.
- Flip it over and put it into a floured proofing basket.
-
Tighten it by pinching the bottom—now the top—if it isn’t connecting or closing tightly.
-
The goal is to have a fairly tight ball with a closed seam on top.
- That top will become the bottom of the loaf, and the smooth part will become the top.
-
The goal is to have a fairly tight ball with a closed seam on top.
- Put the basket in a plastic bag, twist it closed, and clip it.
- Let it sit for 30–60 minutes, or put it in the refrigerator right away.
-
Leave it in the refrigerator overnight or for 24 hours.
- You can go longer—even up to a few days—but it will be a little less bouncy when it bakes.
- The next morning…
- Preheat the oven to 475°F with the Dutch oven inside it for at least 30 minutes.
- Take the dough out of the refrigerator and remove it from the plastic bag.
- Sprinkle salt on top of the dough, to taste.
-
Cover the basket with parchment paper and cut the paper to fit, leaving two handles sticking out. The video shows how.
- This keeps the parchment paper from pinching the bread as it rises in the oven.
- Cover the parchment paper with a plate.
- Flip everything over while holding the basket against the plate.
- Lift off the basket and peel off the liner.
- Sprinkle with salt.
- Using scissors, cut a large, shallow X into the bread.
- Using the parchment-paper handles, lower the dough into the Dutch oven.
- Cover it, leaving the parchment-paper handles sticking out from under the lid.
- Bake for 23 minutes at 475°F. (or 26 minutes at 450°F)
- Remove the lid and lower the oven temperature to 450°F.
- Bake for another 27 minutes.
- Lift it out by the parchment-paper handles and let it cool for an hour—well, maybe less, because who can wait?—before slicing.
- Once it’s cool, bag it.
I hope that helps you get rolling.
One final note: In the winter, I start everything at about 11:00 a.m. or noon and let the starter rise until 6:00 or 7:00 p.m. Then I do the five mixes of dough between 7:00 and 9:00 p.m., let the dough do its bulk rise overnight, and do the proofing in the morning. I bake it either that evening or the following morning.
Temperature is a surprisingly big variable. They make heating pads and other things for this, but I prefer simply adjusting the timing.